How to Host a Website for Free on your Home Computer Using IIS
How to Host a Website for Free on your Home Computer Using IIS
Part 2: Hosting a Website and Installing IIS
This article will show you how to host a website on your home computer for free using IIS in six easy steps. Performing these six steps will greatly help you understand ASP.NET programming in general. Even if you do not have a practical need to host your own website, learning how everything works is of fundamental importance, and it is a great exercise for everyone.
In Part 1, I discussed the concepts of IP addresses and the Domain Name System in detail. If you would like to improve your understanding of those two concepts, I would strongly encourage you to read Part 1 by clicking on IP Addresses and the Domain Name System Demystified.
Step 1: Make sure you have IIS installed.
Go to ‘Start\control panel\add or remove programs’. Next, click the ‘Turn Windows features on or off’
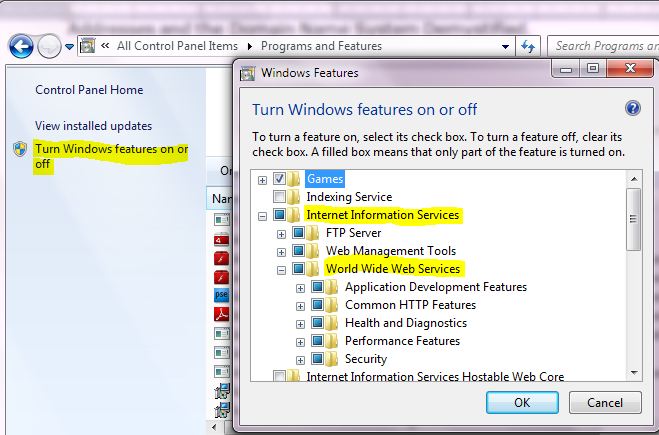
Make sure the checkboxes for Internet Information Services and World Wide Web Services are checked or filled in.
Step 2: Adding a website to IIS
Open windows explorer and navigate to your ‘c:/inetpub/wwwroot’. This is the folder where IIS expects all files for your web and FTP sites to be by default. This is the folder that we will put the files for your first published website in. You need to name your home page ‘index.htm’ as that is the name IIS expects to see as the home page by default. Copy the rest of your files to the ‘c:\inetpub\WWWROOT\’ directory. Since users coming to your website will not be able to move from the ‘WWWROOT\’ folder up to the Inetpub\ folder, the links to other webpages on your site should not include the ‘C:\Inetpub\WWWROOT\’ prefix.
For example, a link in the index.html page to the about.html file should be either:
<a href="about.html">About</a> |
, or
<a href="http://www.yourdomainname.com/about.html">About</a> |
If you specified the following code with the wwwroot as the link, the link would be unresolvable because security prevents visitors from seeing above the wwwroot folder.
<a href="C:\Inetpub\WWWROOT\about.html">About</a> |
The next step is to test to see if your site is working. To do this, open up a web browser and type ‘http://localhost/’ or http://127.0.01 in the address bar, and your home page should appear in the browser. External visitors will not be able to use either of these two addresses as they are only internally addressable to your computer’s WWWROOT folder. We will build a bridge between these internal addresses and one available to the public in later steps.
Step 3: Open Port 80 to Make a website Accessible from the Internet
In order to browse to your site on your home computer, external visitors must first send data through port 80 to IIS on your computer. Firewalls will block this incoming traffic, stopping your website from being accessed.
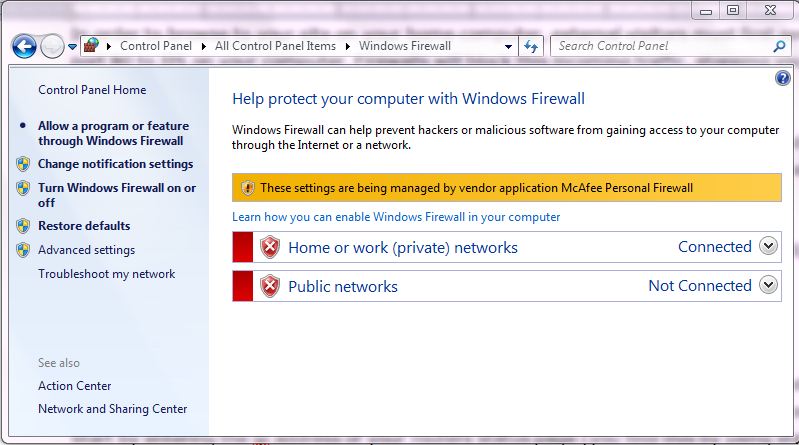
To get around this problem, you need to create an exception or virtual server. Depending on the type of firewall you use, this means one of several different processes. If you use a personal firewall like the Windows Firewall or McAfee, you need to authorize IIS to act as a server.
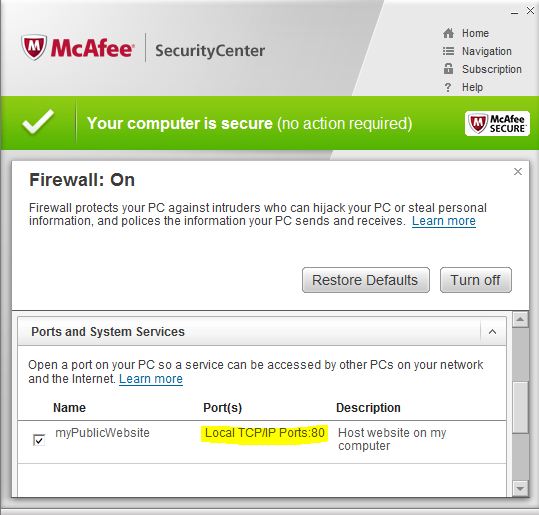
To do this, open Start/Control Panel/Windows Firewall, or open McAfee/Firewall/Settings/Ports and Services and add web server as a service that can access local port 80.
If you use an a home router as your firewall, you will need to create a virtual server (also called port forwarding) to allow your website to be accessible over the Internet. Start by entering the ip address of your routers status page (you find this by using start/cmd/ipconfig and looking at Default Gateway Address)
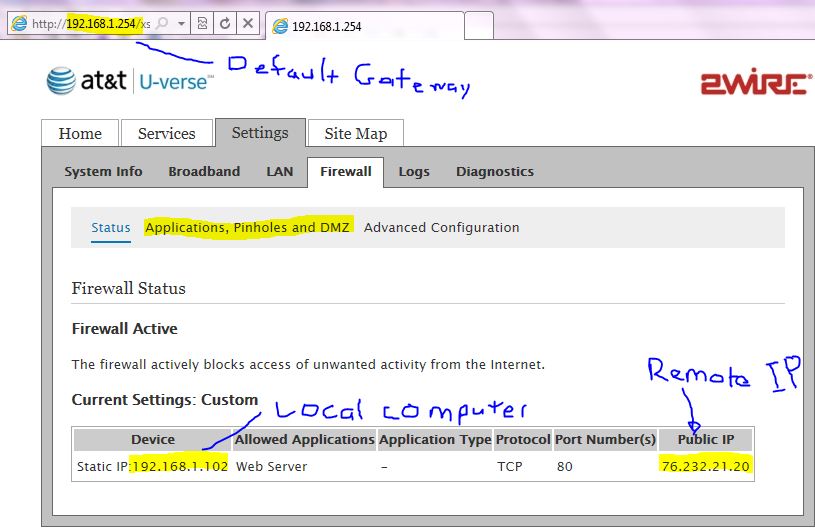
A virtual server is a set of instructions given to the home router. The instructions tell the router that if data comes in over a specific port (say TCP port 80 for hosting a website) that data should be allowed through the firewall and forwarded to a specific computer inside the network. This allows you to open up a “pinhole” where you can make your website (or anything else you want) public without otherwise compromising your firewall security.
When creating a virtual server, you will need to first enter the IP address of the computer that is hosting the website. In the above example, this is 192.168.1.102. Next you need to enter port 80 (since that is the default port for HTTP) to specify where you want to the data to come in.
Finally, you need to choose the port that will be open on the router to receiver the data. In most cases, this will be the same as the port on your hosting computer, so enter 80 here too.
Once you save this information, a public IP Address will be assigned. In the above example, the public address is 76.232.21.20. All data coming from the Internet to the firewall on TCP port 80 will be allowed through the firewall and redirected to your hosting computer, thus allowing access to your website.
Step 4: Determine if your home computer uses a Static or Dynamic IP Address
If you want to host a website, you need to know whether your ISP assigns your PC a static (rarely changing) or dynamic IP address. The most reliable way to find out is to contact your provider and ask. On the other hand, the easiest way to do this is to monitor your IP address for a couple of days of normal use (including connecting and disconnecting from the Internet if you are using DSL) to see if it changes.
To view your IP address, go to ‘start\run’ and type ‘cmd’ to bring up the command prompt, then type ‘ipconfig’. This will list all the IP addresses your computer is currently using. If you use a home router or other Internet sharing device, check its status page to find out your Internet IP address. To find the IP address for the status page, use the ‘ipconfig’ command described above, and look at the address for the Default gateway. Then, enter that IP address directly into an internet browser.
Step 5: Handle a Dynamic IP Internet connection (if not using Static IP)
Dynamic DNS
Dynamic DNS services provide their customers with a DNS address and install a small application on the customer’s computer. This application monitors the customer’s current ISP-designated IP address, and whenever it changes, the link on the DNS Services site between the customers DNS records and their IP address is updated. This makes it where visitors who use the customer’s DNS to get to their website will be directed to the right IP address regardless of how often it changes.
Several companies offer free dynamic DNS service that allow you sign on for a free membership and pick a DNS name from the ones the company has on offer. The only problem is that you can only personalize the first part of the domain name. For example, you might be presented with ‘xxxxxxx.mysite.net’ and be allowed to personalize the xxxxxx portion.
Fortunately, most domain registration services allow you to redirect your registered DNS name to another DNS name. This means you can register the domain name of your choice then redirect it to your yourwebsite.mysite.net dynamic DNS address, which then redirects visitors to your constantly updated IP address.
To set this up, you’ll first have to register with a dynamic DNS provider. Some of the more popular free dynamic DNS sites are DynDNS.org and No-IP.com.
Step 6: Register Domain Name (if you do not want to just use IP Address)
The procedure for registering a domain name with a dynamic IP address was described in step 5.
If you are using a static IP address, all you need to do is register your domain and provide your static IP address as the target for the domain.
Read Part 1
In Part 1, I discussed the concepts of IP addresses and the Domain Name System in detail. If you would like to improve your understanding of those two concepts, I would strongly encourage you to read Part 1 by clicking on IP Addresses and the Domain Name System Demystified.